If you are setting up Qbox for the first time as an Account/Folder Owner, please be sure to read our ‘Account Owner Setup’ document for more instructions. If you received a sharing invitation from another Qbox user to access their folder and set up your Qbox account, please be sure to read our ‘Shared User Setup’ document for more instructions.
If you need to reinstall Qbox on your computer, please follow these instructions: Reinstalling Qbox.
To Install the Qbox Client/Explorer:
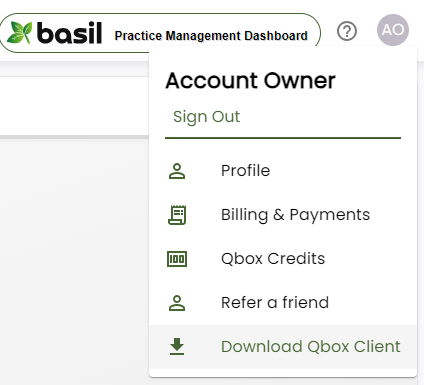
- Log into your account at the Qbox website (www.coraltreetech.com/qbox) and go to your account menu dropdown in the top-right where your initials are shown.
- Click ‘Download Qbox Client’ to download and install the client.
- Run ‘setup.exe’ to install the Qbox client.
Please note:
- If Windows only prompts you to ‘Save’, save the file and run it (open the ‘Setup’ file from your downloads) to initiate installation.
- Qbox may install Microsoft .NET framework if it is not already installed.
- If the download was not successful, please see our ‘Installation Errors’ troubleshooting document.
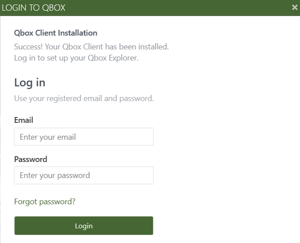
- Sign in to the Qbox Client if prompted. Enter your email address and the password associated with your Qbox account.
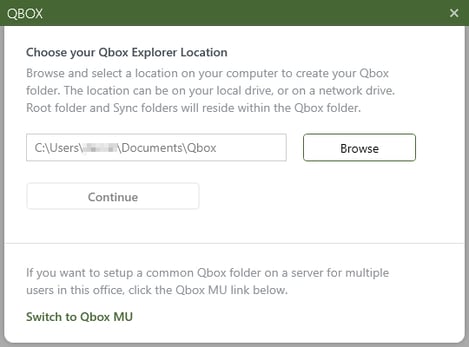
- Qbox will display the default location where the Qbox folder will be created. You can browse and select a different location if necessary. Please note, if the default location displays OneDrive, Dropbox, or any other syncing/backup service in the path, we strongly recommend you browse to select a location such as C:\Users\[Username]\Qbox to avoid interference while syncing and other possible errors.
- Qbox setup is now complete.

Going forward, it is strongly recommended that when you want to work on a shared file, you double-click the file name inside the Qbox Explorer window to allow its associated program (QuickBooks, Excel, Word, etc.) to open the file and ensure the shared copy of the file in your Qbox folder is the one being modified. If you do not open the shared file located in your Qbox folder, you will not receive the lock prompt. Do not begin working on a file until you have locked it. If you are not receiving the lock prompt after opening a file, please review our ‘Not Receiving Lock Prompt’ help guide to troubleshoot or contact Qbox Support immediately.
After setting up and installing Qbox, you will see three Qbox Client icons on your computer:
- A large ‘Qbox Client’ icon on your Desktop: this is the shortcut to run the Qbox Client software. Qbox starts automatically when your computer starts or wakes from being in sleep mode, so normally there should be no need for you to click on this icon. If you exited the program manually, you can start it again by double-clicking on this icon.
- A small Qbox icon on the Windows System Tray, usually at the lower right on your desktop. It could be hidden by Windows (view by clicking the ^ icon), but you can drag it to the taskbar to make it more accessible (as shown below). This is the Qbox ‘process’ icon, indicating that the Qbox Client is running. Double-clicking on this icon opens the Qbox Explorer window.
- A larger ‘Qbox Explorer’ icon on your Windows taskbar. Clicking on this icon displays or hides the Qbox Explorer. This icon is always visible when the Qbox Client is running.
