Creating a Qbox Sync Folder

Sync folders, which incur billing due to file storage and synchronization, are the ones shared with other users. They can be created by the Account Owner or Team Admin at the Qbox Plus Web Dashboard or in the Qbox Client/Explorer.
Creating a Sync folder at the Qbox Plus Web Dashboard:
- Log into your account at the Qbox website (www.coraltreetech.com/qbox).
- Once you’re logged in at the landing page, it may look different whether you have your view set to tiles, spreadsheet, or tree.
Tile view:
List view:
Tree view:
- If you are looking at the landing page in tile or spreadsheet view, click on your Root Folder if it exists. After that, click the Actions button in the upper right, then New Folder.
- If you are looking at the landing page in tree view, click the three dots under the Actions column across from your root folder if it exists, then click New Folder.
- Enter the folder name in the first box. You have the option to invite users by typing their email addresses in the ‘Email’ boxes provided, or you can leave these blank. Lastly, select role for each Shared User that you invite and click ‘Continue’. Clicking ‘Cancel’ will close this window. If you want to create more than one sync folder at the same time, you can click the ‘+ Add more folders’ link.
- To invite additional Shared Users to this new folder, while logged into your account at the Qbox website (www.coraltreetech.com/qbox), please expand your root folder and click the three-dot menu for the sync folder and select Share.
Tile view:
List and Tree view:
If you do not see the ‘Actions’ button or column, follow these instructions to create your own folders:
- Click the Qbox logo in the upper left of the Web Dashboard to take you back to the landing page.
- Click the ‘+Add’ button on the upper right.
- Create your Root folder.
- Create Sync folder(s) and invite any users you would like to have access using the ‘Email’ box. If you need to invite more users, you can click the ‘+ Add more user’ link, or do so later by clicking the three-dot menu on your sync folder and then the ‘Share’ option in that menu.
Creating a Sync folder in the Qbox Client/Explorer:
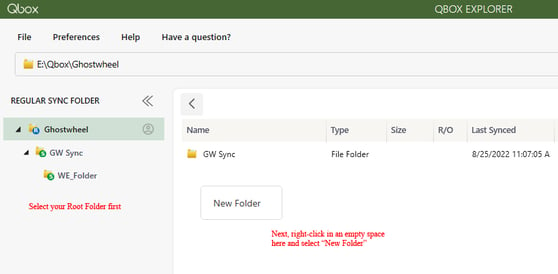
- Open your Qbox Client/Explorer.
- Select your Root folder on the left (topmost folder icon with an ‘R’ in it)
- Right-click in the empty white space on the right-hand side, and select ‘New Folder’ from the menu to create a new Sync folder.

- To invite users to this new folder, log into your account at the Qbox website (www.coraltreetech.com/qbox), find the new sync folder, click the three-dot Actions menu, and select Share.
If you do not see the ‘New Folder’ button and you have access to multiple Root Folders, please ensure you are selecting the Root Folder you own and try again. You may find the name of the Root Folder you own by logging in to our Web Dashboard, clicking your profile initials near the top right, then selecting ‘Profile’; your Root Folder name will be displayed on this page.
If you do not see a name listed next to “Root Folder”, follow these instructions to create your own folders:
- Select the ‘+Add’ button near the top right of the Web Dashboard.
- Create your Root folder.
- Create Sync folder(s) and invite any users you would like to have access using the ‘Email’ boxes. If you need to invite more users, you can do so later by returning to the Files tab, locating the sync folder, clicking the three-dot Actions button, and then clicking ‘Share’.