
This article is intended users under the Basil Advanced plan. Basil Simple users can refer to this article.
When you find that you are sending the same type of eSignature documents to clients very often, you can save yourself time in preparing these documents by creating a template that can be applied to filled-out versions of the same document.
Creating a Template
To create a template for eSign documents, go through the following steps to turn a blank version of the document into a template. Please note that the initial setup of a template will add a copy of the blank document in an existing Client Workspace or My Firm folder.
Step 1: Find an appropriate place in Basil to upload a blank PDF version of the type of document you wish to create a template from (either using the ‘Signatures’ tab or using one of the Workspaces in the ‘Files’ tab). For best results, ensure your PDF is one of the following page sizes: Letter, Legal, A3, A4.
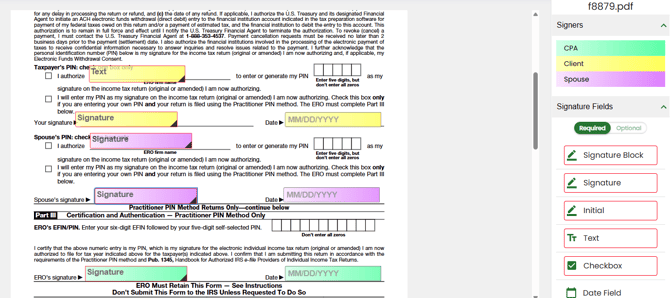
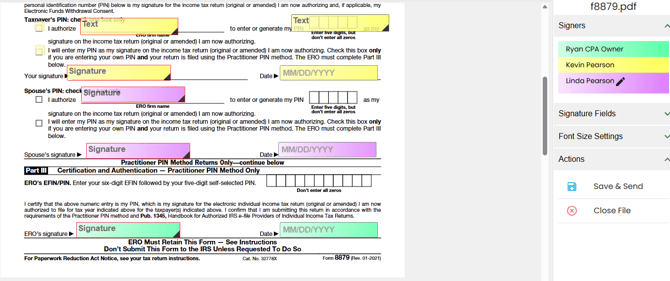
(In this example, we are uploading a blank PDF version of a blank tax form.)
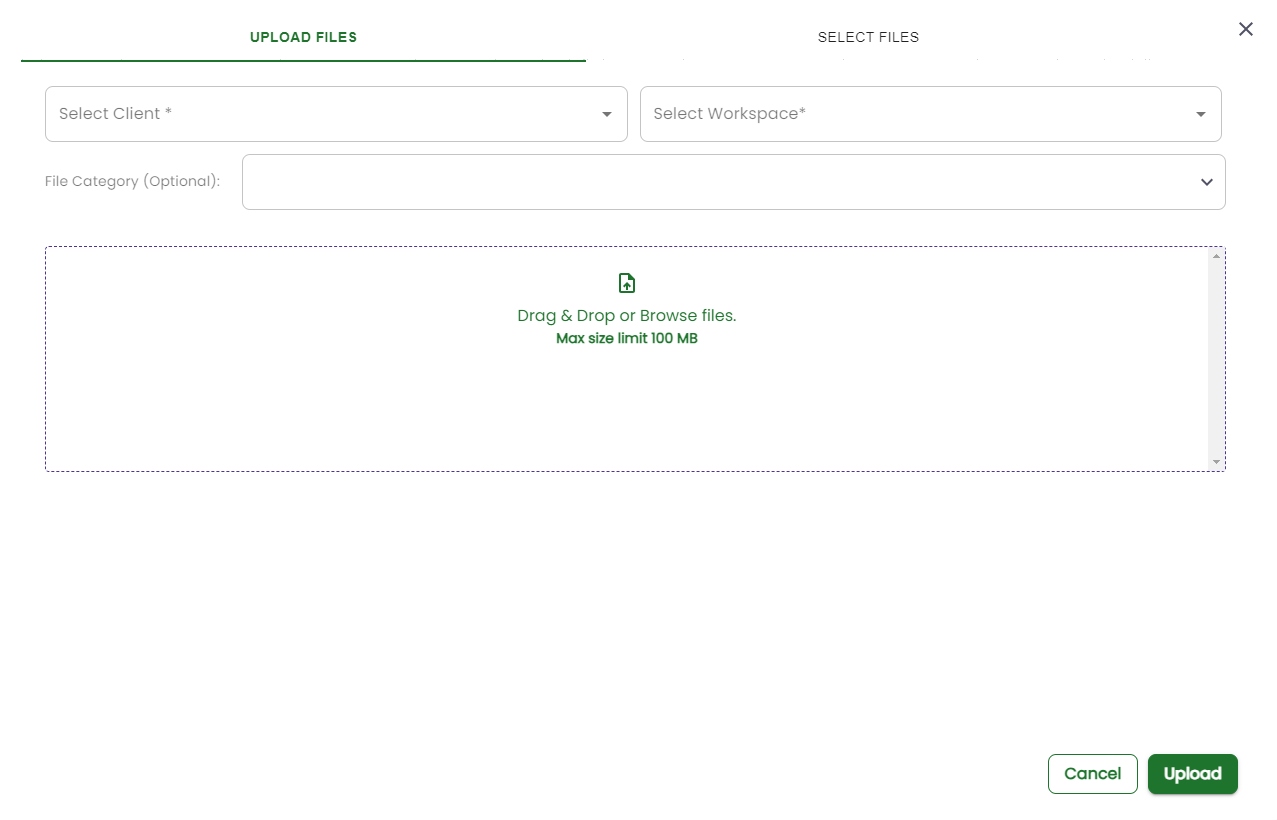
Click the ‘Signatures’ tab at the top of Basil and then select the ‘+Add’ button to open the eSignature upload window. You can select the ‘Client’ and ‘Workspace’ where the document template original will be uploaded. You then drag and drop your PDF to the center box or click on the center box to browse and select the PDF file from your computer. When done, select ‘Upload’.
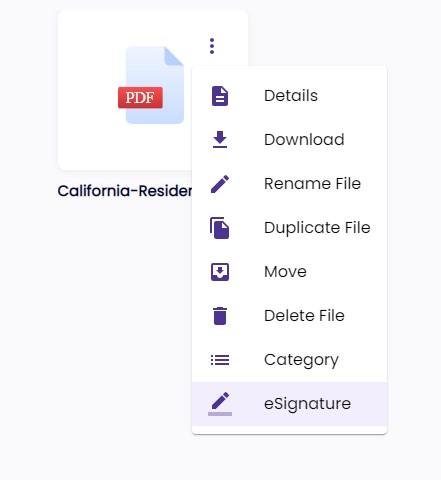
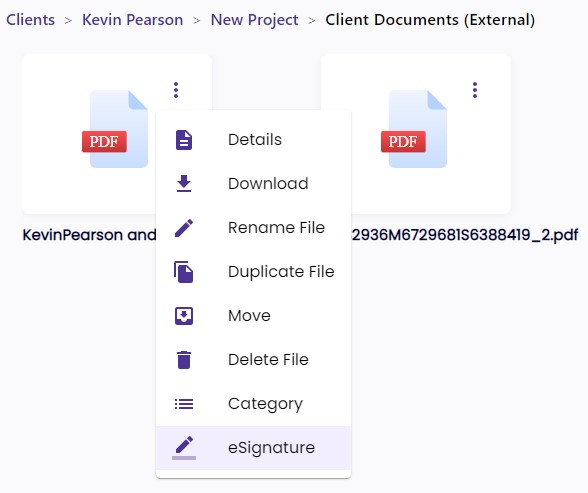
Alternatively, you can use the ‘Files’ tab in Basil to locate or upload the template original to a particular Client Workspace or to a ‘My Firm’ Workspace and then, click the three-dot menu for the file and select ‘eSignature’.
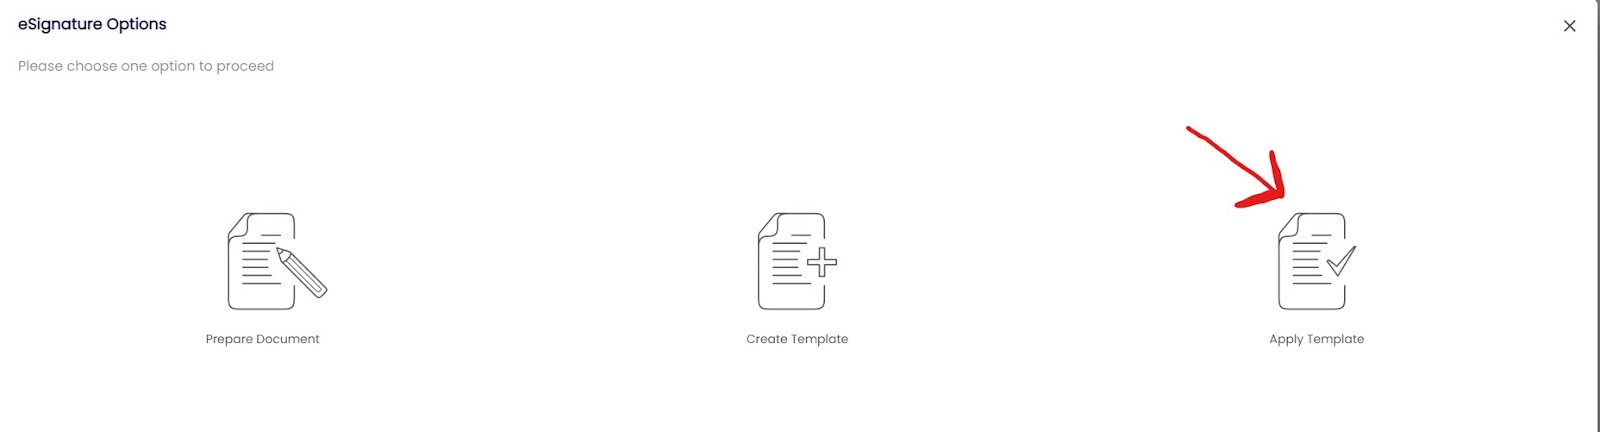
Step 2: Select ‘Create Template’ from the pop-up window.

Step 3: Give the template a name and description. In this example, we’re using a tax form with three signers . Below the name and description, you need to enter the roles of the people who need to sign this type of document. You can add additional people to sign the document by clicking ‘Add more users’ at the bottom left. You can also make sure the document is signed by users in the correct order by checking the ‘Enforce signature order’ box at the bottom left. (Roles tell Basil how many people will be signing the document and lets you pick who needs to sign what in the next step.)
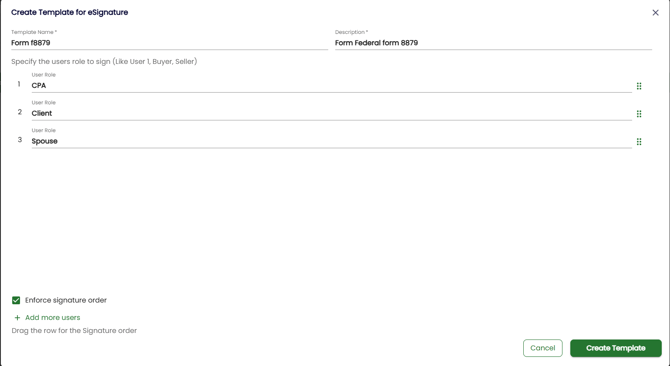
(In this example of a tax form, we need to have 3 people sign the document, the CPA, Client, and Spouse.)
Once all the options are how you like, click on ‘Create Template’ in the lower right corner.
Step 4: Now it is time to prepare the template in the same fashion you prepare a single eSignature document. Drag the required eSignature fields from the right side of the preparation screen to the appropriate field on the document. If you make a mistake by picking the wrong type, you can always right-click on the field to delete it. You can resize the fields by hovering your mouse over the triangle in the lower right corner until it turns into a double-arrow, then left-click and drag to resize the field.
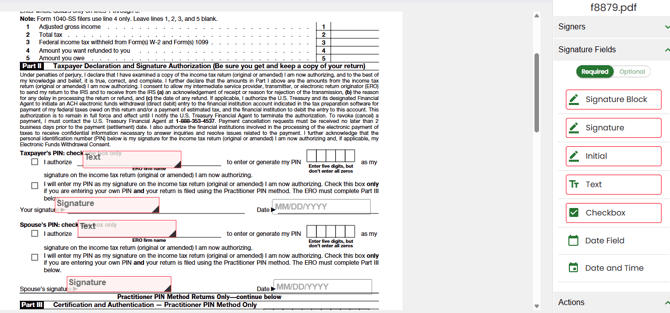
Step 5: Now that you have all the necessary fields on the document and in the places they need to go, you will want to assign them to the appropriate person/user role. Right-click each field and choose the ‘assign’ option to pick who needs to complete that field. You can also left click a series of fields to select them, then right-click one to assign, which will allow you to assign multiple fields to one role at once. You can always change who is assigned to each field if you make a mistake during this step. Ensure all fields are assigned before continuing.
Step 6: Once you are satisfied with all of the fields in the document, click ‘Save as Template’ in the lower right corner.
Applying a Template
You can apply the template that was created to another copy of the document and send it to persons that need to sign it by following the steps below.
Step 0 (Optional): If you have a blank version of the document in a My Firm folder, you can first go to that folder, locate the file, and click the three-dot menu, and use the ‘File Copy’ function to copy it into a Client Workspace folder.

Step 1: Select or upload the document to the appropriate location in Basil. You can do this through either:
- Option A: The Signatures tab
- Option B: The Files tab
Option A: You can click the ‘Signatures’ tab at the top of Basil and then select the ‘+Add’ button to open the eSignature upload window. In the ‘Upload Files’ tab, you can select the ‘Client’ and ‘Workspace’ where the document eSignature will be uploaded to. You then drag and drop your PDF to the center box or click on the center box to browse and select the PDF file from your computer. When done, select ‘Upload’. Alternatively, you can use the ‘Select Files’ tab to browse to a client folder that already has the blank document file.
Option B: You can use the ‘Files’ tab in Basil to locate or upload the eSignature file to a particular Client Workspace, then click on the file’s three-dot menu and choose ‘eSignature’.
Step 2: In the pop-up window select ‘Apply Template’. Next, pick the appropriate template from the list presented.
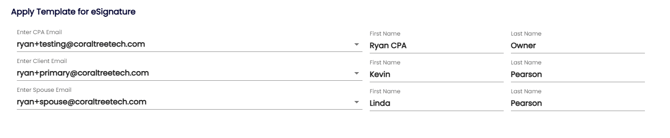
Step 3: On the next screen, enter the email address of the user(s) signing the document for each appropriate role. If the signee is a client in Basil then you’ll be able to pick them from the dropdown list. If they are not one of your clients in Basil, then you’ll need to type out their full email address and also their first and last name on the correct role line. Once all emails have been entered click ‘Apply Template’ in the lower right corner.
Step 4: This will bring you to the final review of the eSignature document before sending it. You’ll see all the required fields highlighted in each user’s assigned color and you can check which signee is which by opening the “Signers” drop-down at the top right.
Step 5: If everything looks good you can click ‘Save & Send’ to send the eSignature document to all users.
Editing an existing template
If you find that an existing PDF form you use regularly with your templates has changed, you can modify the existing template to reflect the updated form rather than having to create a whole new template.
To update your esignature template, go to the “Signatures” tab of Basil.

Next, locate the template you wish to update and select the “pencil icon” to edit it.

You can change the number of signers if necessary; otherwise, you can click “Update Template” to update the template fields.

You can now update or add fields to the template. Once done, select “Update Template” to save your changes.
